

Getting Started#
Schedule#
For the March 3-7, 2025 United Nations OG-ZAF training in Cape Town, we will be following the schedule in Table 1.
Day |
Session |
Topic |
Materials |
|---|---|---|---|
Mon. |
Morning |
Organizer introductions |
|
Afternoon |
|||
Tue. |
Morning |
Review 3-period-lived-agent exercises (solutions in this folder) |
|
Afternoon |
Running OG-ZAF, inputs, outputs |
||
Wed. |
Morning |
Running OG-ZAF: Revisit some reforms from 2-day visit |
|
Afternoon |
OG-ZAF output: Tools to visualize/tabulate output |
Built-in tools notebook, Notebook with plotting using a forecast |
|
Thu. |
Morning |
Calibrating OG-ZAF: Issues and hot spots |
|
Afternoon |
Calibrating OG-ZAF: Issues and hot spots |
||
Fri. |
Morning |
Open work, project hackathon, office hours |
|
Afternoon |
Presentation of projects |
Other materials:#
Install Python and uv#
OG-ZAF is a large-scale overlapping generations macroeconomic model of South African fiscal policy. It is written in the Python programming language. The project uses uv to manage Python and all package dependencies. You do not need to install Python separately: uv downloads a compatible Python interpreter automatically when you create the project environment (a later step below).
Installing uv#
On macOS or Linux, open your terminal and paste:
curl -LsSf https://astral.sh/uv/install.sh | sh
Then make the just-installed uv available in the current terminal (from your next terminal session it is available automatically):
source $HOME/.local/bin/env
On Windows, open PowerShell and paste:
powershell -ExecutionPolicy ByPass -c "irm https://astral.sh/uv/install.ps1 | iex"
then open a new PowerShell window so the just-installed tool is found.
Verifying your installation#
Open your terminal (macOS/Linux) or PowerShell (Windows) and type uv --version. This command should result in output like uv 0.11.30.
>>> uv --version
uv 0.11.30
Installing Git and GitHub#
Verifying you have already installed Git#
On Mac or Windows#
Open your terminal (Mac) or command prompt (Windows) and type git --version. You should get output like git version 2.37.2.
>>> git --version
git version 2.37.2
On Linux#
Open your terminal and type git --version. You should get output like git version 2.37.2.
>>> git --version
git version 2.37.2
Installing Git#
If you do not already have Git installed on your computer, we recommend that you follow the instructions on the GitHub page git-guides/install-git for installing Git. This page has downloadable executable installers that are easy to use.
Basic configuring of Git on your machine#
Once you have Git installed, you will need to configure some of the basic settings in Git. To view all of your Git settings, you can type the following into your computers terminal:
git config --list --show-origin
When getting set up, it’s important to enter your credentials so that git on your local machine is linked to your account on GitHub. You’ll do this by first entering your name:
git config --global user.name "Your Name"
Then, you’ll enter your email (using the email that you used to register your account on GitHub.com):
git config --global user.email yourname@example.com
You can also set your default text editor for use with git by following the example below, which makes vim the default:
git config --global core.editor vim
For more information on configuring git, see the full instructions from git here.
Set up a GitHub account#
You will need a GitHub account to properly interact with OG-ZAF. This will allow you to interact with the repository with a wide range of collaborative functionalities, including forking repositories, creating issues and discussions, and submitting pull requests. To set up a GitHub account, follow these instructions at GitHub.com.
Most likely, the free organization account will be the right place to start for you. We recommend choosing a username suitable for a professional setting, as this will be your public profile on GitHub.
Fork and clone OG-ZAF repository#
Forking the OG-ZAF repository means that you are making a copy of that repository on your GitHub account in the cloud.
Go to the UN GitHub organization’s main repository for OG-ZAF (EAPD-DRB/OG-ZAF).
In the upper-right area of the browser page, click the “Fork” button and select “Create fork”. This will create an exact copy of the OG-ZAF repository on your account. When you do this, you should see that the URL to the page has changed to
https://github.com/[YourGitHubHandle]/OG-ZAF.
The next step is to clone the repository from its current place in the cloud to your local computer’s hard drive.
Open your terminal (macOS/Linux) or PowerShell (Windows)
Navigate to the folder where you want this repository to reside. Make sure this is not a location on your hard drive that is mapped from the cloud. This file should live on your local computer. You already have the repository in the cloud on your GitHub account.
Copy the contents of your repository in the cloud to your hard drive by typing:
git clone https://github.com/[YourGitHubHandle]/OG-ZAF.gitChange directory to this new directory by typing:
cd OG-ZAFCreate an additional git remote named “upstream” that points to the main UN remote repository by typing:
git remote add upstream https://github.com/EAPD-DRB/OG-ZAF.git
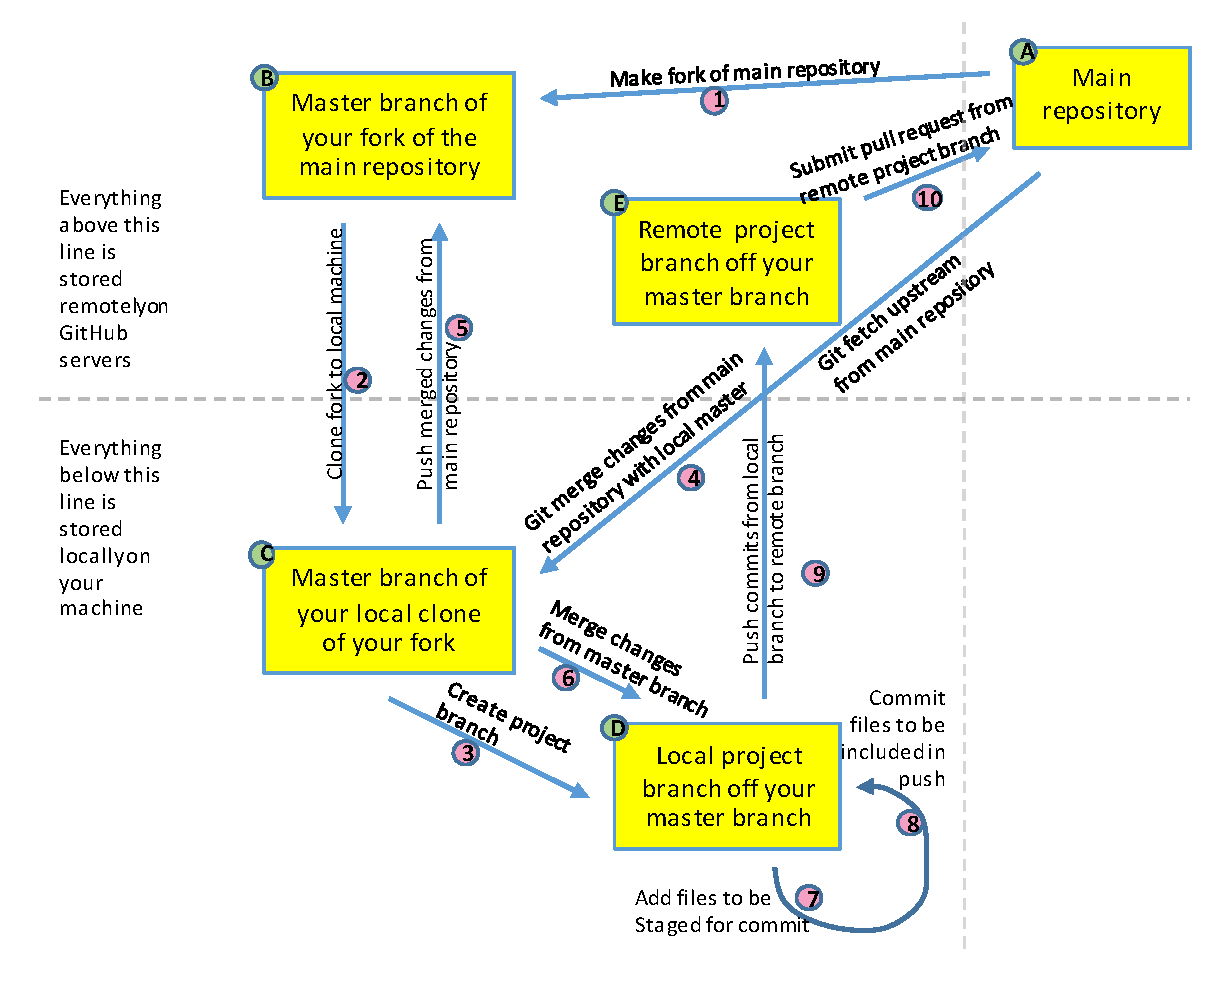
Fig. 9 Flow diagram of Git and GitHub workflow#
Create the project environment with uv#
The project environment is a local .venv folder at the root of the repository, containing Python and the exact package versions pinned in uv.lock. It lets users across operating system platforms and different hardware configurations run the model with the same packages, functionality, and results.
If you have installed uv and you have cloned your OG-ZAF fork of the repository to your local machine, you can create the environment by doing the following steps:
Open your terminal (macOS/Linux) or PowerShell (Windows) and navigate to the OG-ZAF repository folder on your hard drive.
Type the following command:
uv sync --extra dev
That single command creates the environment, downloads a compatible Python if needed, and installs the ogzaf Python package with all its dependencies. You will now be able to run the modules of the OG-ZAF model from scripts and from Jupyter notebooks. Run any command inside the environment with uv run (for example, uv run python examples/run_og_zaf.py), or activate the environment first with source .venv/bin/activate (macOS/Linux) or .\.venv\Scripts\Activate.ps1 (Windows).
Using Jupyter notebooks#
A nice way to execute lines of code on your local computer is to use Jupyter notebooks. The jupyter package is installed as part of the development dependencies from the previous step. You can open a Jupyter notebook directly in VS Code, or you can open one from your terminal or PowerShell.
Open Jupyter notebook from terminal or PowerShell#
If you are using Mac or Linux, open your terminal. If you are using Windows, open PowerShell.
Navigate to the folder of the OG-ZAF repository on your local machine.
Open a Jupyter notebook session by typing
uv run jupyter notebook. This will open a local server page that opens in your browser. This page will show the directory where you are currently working.Either click the “New” button in the upper-right portion of the screen, or select “File” then “New” then “Notebook” from the menu at the upper-right. Make sure to select the kernel from the project’s
.venv.
Once you have completed these steps, you can interactively write code and execute it in steps using the Python code cells in the Jupyter notebook. You can also write text descriptions in the markdown cells.
Choosing a text editor#
Using a good text editor for your coding is a key productivity choice. We recommend the VS Code (Visual Studio Code) editor from Microsoft (download from https://code.visualstudio.com/Download). This text editor is free, it is open source, and it has the largest community of active users and active developers. It also has a ton of extensions that help you customize and increase the efficiency of your coding workflow.